Friday, August 30, 2013

Link stitch, Long stitch, and Limp bindings at PBI

After having so many guest bloggers this summer, it is my turn now, to write about another one of the PBI classes. I absolutely loved this class taught by Adam Larsson. Partly because these book structures have been a particular interest of mine for several years and as such, I have actually made a lot of books like this and have tried to incorporate the techniques into a lot of my work. More importantly though, this would be the first time that I ever had instruction from an expert in this area, from someone who is working with actual historical examples of these books, from the 13th or 14th centuries that he has examined and studied first-hand.

My previous experience with this type of binding, was all based on tidbits of information here and there, scattered around the internet and overviews in a couple of books (Szirmai and Langwe). I have had to extrapolate a lot of the details about how the books were made, how the sewing was started, how the covers were folded, how the buttons and straps were attached, etc. I would often just try to replicate what I could see in photographs (example) without any detailed instructions.

The instructor for this class, Adam Larsson, has worked with these bindings enough that he was able to give me some insights about how these things were typically done. Adam works in the conservation lab at Uppsala University Library in Uppsala, Sweden, home to one of the most important collections of historic bindings in Scandinavia.

The class was called "The Three Ls: Limp - Link - Long" and that's exactly what it was. We learned three different methods of stitching a limp vellum binding, using just link stitch, using just long stitch, and using a combination of both.


The first book we did, was sewn with only link stitches. I think most people in the class found this one to be the most difficult of the structures that we covered. It is tricky to do this one, and I had only attempted it a couple times in the past. Having now seen how Adam does it, I may be willing to use this more in the future. Admittedly though, I haven't tried it again since the class. During the class, however, I did two books with this structure. The first was four rows of link stitches. The second was three rows of link stitches (which was harder than four!). The stitched circles are just decorative and were done on the spine before the book was bound.


After the link stitch book, we did the combination of link stitch and long stitch. This structure was most familiar to me, and I did three of this style during the class. The first one, I added the extra weaving on the long stitches. The second one, I added the decorative holes punched in the spine piece, and the third was made with soft leather (rather than vellum) and has the buttons on the spine rather than on the front of the book.


Adam demonstrated a third structure, which was a long stitch done without a link stitch. I don't think everyone tried this one, but I was a real keener, and surged ahead and made two of these. In fact, I really liked this structure. I had tried this technique only once before and I did it very differently that time. The way Adam explained it, it suddenly became far more attractive as an option for future work! These are the two that I made in the class, both with two spine pieces, one for each set of stitches.


Although we did most of our books without turn-ins, I did one with turn-ins and consequently made my first parchment tacket. I've made tackets with linen thread before, but making them from strips of vellum is much cooler. Starting with a long skinny strip of vellum, it has to be really wet, then twisted and stretched until it is dry. Then it is dampened again to make it pliable to create the tacket. As the tacket dries in place, it becomes a super solid attachment. This was certainly one of the highlights of my week!

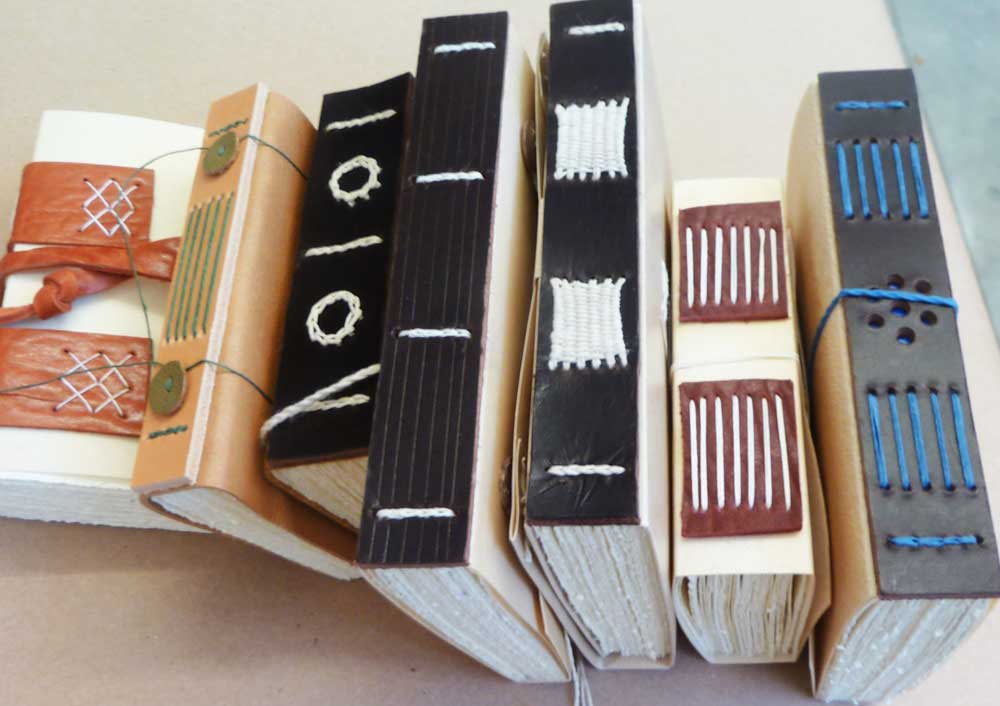
Although I had a lot of questions for Adam about the details of these bindings, the main thing that I learned, was that these historic bindings are greatly varied. The sewing techniques vary from one binder to the next; and, the use of spine plates and buttons and straps and decorative elements also vary from one binder to another and from one region to another, etc. So, there isn't one single correct way to construct these types of books and it is possible to be very creative with them. Other members of the class proved that over and over again. As I surged ahead trying to memorize the stitching techniques, other people in the class were creating masterpieces with decorative elements that I did not even attempt. Here are a few photographs taken at the end of the session where everyone's books were on display. The variations seen here are only a small sampling; the possibilities are truly endless.


Wednesday, August 14, 2013

Guest Blogger Fran Kovac, tells us about her PBI class with Pam Spitzmueller

Fran Kovac is a bookbinder in Columbus, Ohio, and teaches basic bookbinding techniques at the Morgan Conservatory in Cleveland, Ohio. Apparently she is still camera-shy, so rather than having a headshot of her here, I am using this picture of her fingers sewing a link-stitch endband, again. At PBI this year, Fran was one of the lucky students in Pam Spitzmueller's class. Of course, Pam's expertise in historic bookbinding techniques is exceptional and this class produced exceptional work! The class was called "An Historical, Personal Almanac with a nod to Individual Calendar Books & Wood Leaf Books" where each participant created a replica of an incredible little book.

In this class, we made a model of a lovely little 1581 Elizabethan pocket almanac that includes erasable writing pages with a brass stylus tucked into the back board. The book was fully leather bound, on thin wood boards. There are two fore-edge brass clasps and blind stamping of a Renaissance flourished design of a central diamond shaped panel and corner pieces.

William Shakespeare was only 17 years old when the book we recreated in this class was printed and bound in 1581 A.D.. It was, for businessmen in the 16th century, a Blackberry of sorts...a combination of an almanac, a diary, a calendar and notepad. While it didn't send or receive messages, it served as a personal organizer for the merchants of the times, and was printed and reprinted in different formats for several decades.


This is a photograph of a photocopied picture (!) of the
original book that the class would be replicating.

It is a small book, measuring only 3 1/8" x 4 3/8" (7.9 x 11.3 cm) (spine dimension given first). It consists of four signatures (sections) of paper, and five bi-folios of the erasable pages. In the original, the erasable pages were made of animal parchment, and coated with a gesso-like mixture that would take an impression, then wipe away. The nine signatures were arranged with one paper signature in front, five bifolios of erasable pages, and three signatures in back. There are two single endsheets, with the stubs next to, but not pasted down on, the boards. With the thin [1/8" (3 mm)] basswood boards, the spine is 3/4” ( 1.8 cm) thick.

In the original, the first signature consisted of the title page, rules for the changes of the moon, a 24 year almanac and calendar, and a monthly calendar. There was a blank page after the five erasable pages (we used cardstock, although I made one bifolio from parchment), and then followed "A prayer for the forgiveness of our sins," a section on weights and measures, a history of England, several pages of descriptions of the various coins of the realm, and other helpful information for the business traveler of the times.


Fran's finished replica.

After arranging the signatures, the book was sewn on three thin cords; that is, three sewing stations and 2 kettle stations. We started with 8 ply cord, but removed three strands to be left with a five ply cord. It is slightly recessed into the signatures, and the sewing is straightforward, around the cords in the paper signatures, but not looped around, merely over the cords in the parchment signatures. The spine was then pasted up with PVA, rounded, and lined with Mohawk Superfine paper.

The boards were shaped with a slight round on the outside spine edge, and beveled on the inside fore-edge, head and tail, to accommodate the leather turn ins. The boards were aligned on the textblock, and the cords frayed and pasted down on the boards. We were using a beautiful calf leather prepared by Pergamena, which required only modest edge paring and some paring at the spine head and tail. The first step was dampening the spine and using PVA to glue up the spine, boning down around the cords. Then, using wheat paste, we pasted out the leather and finished the covering of the book. Pam had designed a large die to create the debossed diamond effect on both front and back covers. This was accomplished by dampening the leather, placing the die, and pressing in a nipping press for at least 6 minutes. The lines surrounding the stamp are cold tooled with a bone folder. The brass stylus, which was formed from 1/16" brass rod, fits into a groove in the back board, and protrudes slightly at the fore edge.


Close-up of the clasps that Fran made for her book.


The final step was creating the brass clasps which hold the book closed. The clasps grasp on the back board, in the English style. We used shears and nibblers to rough out the clasps, files to shape and smooth them, and riveted or pinned them onto the covers using brass escutcheon pins. Although two clasps might not seem necessary on such a small book, the parchment leaves, being hygroscopic, would tend to curl with changes in the humidity. It was a wonderful class, and many thanks to Pam Spitzmueller!

- Fran Kovac


Monday, August 05, 2013

Chalkboard Journals


Another great idea from me. Chalkboards on journal covers! And each one features some of my own hand-marbled paper too. I think these might serve as a perfect any-occasion book. The chalkboard area on the front cover can be changed as often as you like. Perfect for a cottage guestbook, where you can change the date or add a message for special events. Or keep it on the table in the front hallway, where you can jot quick reminders to the family as they are coming and going! It could be your bedside journal, for quick thoughts when you are half asleep - rewrite them inside the book, more coherently in the morning when you're fully awake! This book could also work as a sketchbook since it opens perfectly flat and has heavy paper inside. Write your daily inspirations on the front cover. Let me know in the comments if you have other suggestions for these journals.